Html5实现iPhone开机界面示例代码
时间:2015-08-09想到可以用Html5来仿照苹果操作系统做一个能在Web平台运行的ios。
当然,要开发出一个操作系统,等我再归山修练一百年再说吧。今天就先娱乐一下,先搞一个开机界面。
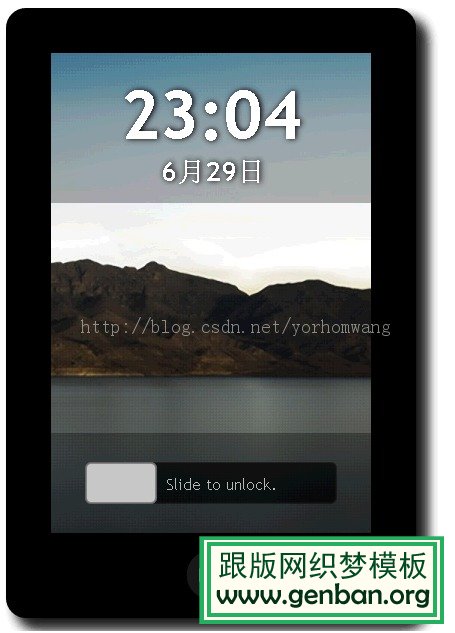
完工后的图片:

担心图片是被我PS后的同学可以直接进入下面的地址测试:
http://www.cnblogs.com/yorhom/articles/3163078.html
由于lufylegend封装得的确不错,本次开发还是用该引擎做的。代码不多,感兴趣的朋友可以直接看一下。
index.html中的代码:
<!DOCTYPE html>
<html>
<head>
<meta charset="utf-8" />
<title>iphone</title>
<script src="./lufylegend-1.7.7.min.js"></script>
<script src="./js/Main.js"></script>
</head>
<body>
<div id="mylegend">loading......</div>
</body>
</html>
Main.js中的代码:
init(50,"mylegend",450,640,main);
LGlobal.setDebug(true);
var loadData = [
{path:"./js/Shape.js",type:"js"},
{path:"./js/BootPage.js",type:"js"},
{name:"wallpaper",path:"./images/wall_paper.jpg"}
];
var datalist = {};
var backLayer,iphoneLayer,screenLayer,buttonLayer;
var iosShape;
var bootPage;
function main(){
LLoadManage.load(loadData,null,gameInit);
}
function gameInit(result){
datalist = result;
//初始化层
initLayer();
//加入iphone外壳
addShape();
//加入开机界面
addBack();
}
function initLayer(){
//背景层
backLayer = new LSprite();
addChild(backLayer);
}
function addShape(){
iosShape = new Shape("IPHONE",400,600);
iosShape.x = 15;
iosShape.y = 5;
backLayer.addChild(iosShape);
}
function addBack(){
bootPage = new BootPage();
bootPage.x = 40;
bootPage.y = 40;
var wallPaperWidth = iosShape.getScreenWidth();
var wallPaperHeight = iosShape.getScreenHeight();
bootPage.addWallPaper(new LBitmapData(datalist["wallpaper"],200,480,wallPaperWidth,wallPaperHeight));
bootPage.addTime();
bootPage.addSlider();
iosShape.addChild(bootPage);
}
Shape.js里的代码:
/*
* Shape.js
**/
function Shape(type,width,height){
var s = this;
base(s,LSprite,[]);
s.x = 0;
s.y = 0;
s.deviceWidth = width;
s.deviceHeight = height;
s.type = type;
//外壳层
s.shapeLayer = new LSprite();
s.addChild(s.shapeLayer);
//Home按钮层
s.homeButtonLayer = new LSprite();
s.addChild(s.homeButtonLayer);
//屏幕层
s.screenLayer = new LSprite();
s.addChild(s.screenLayer);
//显示自身
s._showSelf();
}
Shape.prototype._showSelf = function(){
var s = this;
switch(s.type){
case "IPHONE":
//画外壳
var shadow = new LDropShadowFilter(15,45,"black",20);
s.shapeLayer.graphics.drawRoundRect(10,"black",[0,0,s.deviceWidth,s.deviceHeight,15],true,"black");
s.shapeLayer.filters = [shadow];
//画屏幕
s.screenLayer.graphics.drawRect(0,"black",[s.deviceWidth/10,s.deviceWidth/10,s.deviceWidth*0.8,s.deviceHeight*0.8],true,"white");
//画Home按钮
s.homeButtonLayer.graphics.drawArc(1,"black",[s.deviceWidth/2,s.deviceHeight*0.87 + s.deviceWidth/10,s.deviceWidth/16,0,2*Math.PI],true,"#191818");
s.homeButtonLayer.graphics.drawRoundRect(3,"white",[s.deviceWidth/2-10,s.deviceHeight*0.87 + s.deviceWidth/10 - 10,20,20,5]);
break;
}
};
Shape.prototype.getScreenWidth = function(){
var s = this;
return s.deviceWidth*0.8;
};
Shape.prototype.getScreenHeight = function(){
var s = this;
return s.deviceHeight*0.8
};
最后是BootPage.js里的代码:
/*
* BootPage.js
**/
function BootPage(){
var s = this;
base(s,LSprite,[]);
s.x = 0;
s.y = 0;
s.timeLayer = new LSprite();
s.sliderLayer = new LSprite();
}
BootPage.prototype.addWallPaper = function(bitmapdata){
var s = this;
//加入背景图片
s.wallPaper = new LBitmap(bitmapdata);
s.addChild(s.wallPaper);
};
BootPage.prototype.addTime = function(){
var s = this;
var shadow = new LDropShadowFilter(1,1,"black",8);
s.addChild(s.timeLayer);
s.timeLayer.graphics.drawRect(0,"",[0,0,iosShape.getScreenWidth(),150],true,"black");
//加入时间文本区
s.timeLayer.alpha = 0.3;
s.timeText = new LTextField();
s.timeText.x = 70;
s.timeText.y = 20;
s.timeText.size = 50;
s.timeText.color = "white";
s.timeText.weight = "bold";
s.timeText.filters = [shadow];
//加入日期文本区
s.dateText = new LTextField();
s.dateText.size = 20;
s.dateText.x = 110;
s.dateText.y = 100;
s.dateText.color = "white";
s.dateText.weight = "bold";
s.dateText.filters = [shadow];
s.addChild(s.timeText);
s.addChild(s.dateText);
//通过时间轴事件更新日期
s.addEventListener(LEvent.ENTER_FRAME,function(s){
var date = new Date();
if(date.getMinutes() < 10){
if(date.getHours() < 10){
s.timeText.text = "0" + date.getHours() + ":0" + date.getMinutes();
}else{
s.timeText.text = date.getHours() + ":0" + date.getMinutes();
}
}else{
if(date.getHours() < 10){
s.timeText.text = "0" + date.getHours() + ":" + date.getMinutes();
}else{
s.timeText.text = date.getHours() + ":" + date.getMinutes();
}
}
s.dateText.text = date.getMonth() + 1 + "月" + date.getDate() + "日";
})
};
BootPage.prototype.addSlider = function(bitmapdata){
var s = this;
s.addChild(s.sliderLayer);
s.sliderLayer.graphics.drawRect(0,"",[0,iosShape.getScreenHeight()-100,iosShape.getScreenWidth(),100],true,"black");
s.sliderLayer.alpha = 0.3;
//加入滑块框层
var barBorder = new LSprite();
barBorder.x = 35;
barBorder.y = iosShape.getScreenHeight()-70;
s.addChild(barBorder);
//加入滑块说明文字
var moveBarCommont = new LTextField();
moveBarCommont.size = 12;
moveBarCommont.x = 80;
moveBarCommont.y = 10;
moveBarCommont.color = "white";
moveBarCommont.text = "Slide to unlock.";
barBorder.addChild(moveBarCommont);
//加入滑块层
var bar = new LSprite();
bar.x = 35;
bar.y = iosShape.getScreenHeight()-70;
bar.canMoveBar = false;
//加入鼠标点击和鼠标移动事件
bar.addEventListener(LMouseEvent.MOUSE_DOWN,function(event,s){
s.canMoveBar = true;
});
bar.addEventListener(LMouseEvent.MOUSE_UP,function(event,s){
LTweenLite.to(bar,0.5,{
x:35,
onComplete:function(s){
s.canMoveBar = false;
}
});
s.canMoveBar = false;
});
s.addChild(bar);
bar.addEventListener(LMouseEvent.MOUSE_OUT,function(event,s){
LTweenLite.to(bar,0.5,{
x:35,
onComplete:function(s){
s.canMoveBar = false;
}
});
s.canMoveBar = false;
});
s.addEventListener(LMouseEvent.MOUSE_MOVE,function(event){
if(bar.canMoveBar == true){
bar.x = event.offsetX - 70;
if(bar.x > 215){bar.x = 215;}
if(bar.x < 35){bar.x = 35;}
}
});
s.addChild(bar);
//画出滑块框
barBorder.graphics.drawRoundRect(2,"#191818",[0,0,250,40,5],true,"black");
barBorder.alpha = 0.7;
//画出滑块
bar.graphics.drawRoundRect(2,"dimgray",[0,0,70,40,5],true,"lightgray");
bar.alpha = 0.7;
};
由 于本次是偶自娱自乐,所以代码就不多讲了,只讲一下Shape.js和BootPage.js的用途。Shape.js是用来绘画我们iphone手机外 壳用的类,而BootPage.js是开机界面的类。两者的功能不同,相当于Shape.js用来处理硬件外观,BootPage.js用来处理显示。
其他的就留个大家自己看吧。虽然代码有点长,但是都不带逻辑性。慢慢读就Ok!当然,读不懂的同学可能是没有了解过lufylegend,以下是引擎官方的网站:
http://lufylegend.com/lufylegend
引擎API文档:
http://lufylegend.com/lufylegend/api
觉得用CSDN博客阅读代码有些困难的同学,不仿用你的编辑器打开源代码看看,源代码下载地址如下:
http://files.cnblogs.com/yorhom/iphone01.rar
相关文章
 Js正则表达式过滤特殊字符、表情Js正则表达式过滤特殊字符、表情的实例代码: let ret = "12312ffds#¥@¥#%^***(()))*)).`@%@¥@¥", val = this.customDeviceName;//特殊字符过滤let pattern
  让你的HTML5&CSS3网站在老IE中也能正常显示的3种方法1、htmlshiv.js Remy开发的HTML5shiv工具能利用JavaScript在老式IE里创建main,header,footer等HTML5元素。也就是说使用JavaScript能创建这些本来不存在的HTML5
 HTML5之Canvas基础绘图教程HTML5 火的正热,最近有个想法也是要用到HTML的相关功能,所以也要好好学习一把。 好好看了一下Canvas的功能,感觉HTML5在客户端交互的功能性越来越强了,今天看
 HTML5 respond.js 解决IE6~8的响应式布局问题响应式布局,理想状态是,对PC/移动各种终端进行响应。媒体查询的支持程度是IE9+以及其他现代的浏览器,但是IE8在市场当中仍然占据了比较大量的市场份额,使我们
 微软开源新一代浏览器的JavaScript引擎核心代码近日,微软宣布开源Chakra的核心组件。Chakra是微软新一代浏览器 Microsoft Edge的JavaScript引擎。相关代码将于2016年1月上传到微软的GitHub账号,项目名称为 C
 Google Chrome终于支持CSS Variables了这篇文章报道的不是“新闻”,因为W3C早已开始着手CSS变量方面的工作。至于Google,则要追溯到11月初,当时该公司主要开发人员之一的Addy Osmani宣布了率先在Chr