JS 中使用Promise 实现红绿灯实例代码(demo)
时间:2023-12-08下面是使用 Promise 实现红绿灯实例代码的攻略。
红绿灯实例代码
在使用 Promise 实现红绿灯实例代码之前,我们需要了解什么是红绿灯实例代码。红绿灯实例代码是一种模拟红绿灯闪烁的代码,通常用于展示 Promise 的作用。
以下是基于 Promise 实现红绿灯实例代码的完整攻略:
1. 创建 Promise 对象
在开始使用 Promise 实现红绿灯实例代码时,首先需要创建一个 Promise 对象。Promise 对象是一种承诺,它表示一段异步操作是否完成。
示例代码如下:
function red() {
  return new Promise(function(resolve, reject) {
    setTimeout(function() {
      console.log('红灯亮起');
      resolve();
    }, 3000);
  });
}

function green() {
  return new Promise(function(resolve, reject) {
    setTimeout(function() {
      console.log('绿灯亮起');
      resolve();
    }, 2000);
  });
}

function yellow() {
  return new Promise(function(resolve, reject) {
    setTimeout(function() {
      console.log('黄灯亮起');
      resolve();
    }, 1000);
  });
}
上面的代码中,我们使用 new Promise() 方法创建了三个 Promise 对象,分别表示红灯、绿灯、黄灯。每个 Promise 对象都是一个函数,这个函数接收一个 resolve() 方法作为参数,并在指定的时间后调用这个方法。
Promise 对象中的 resolve() 方法表示异步操作已经完成,reject() 方法则表示异步操作发生错误。
2. 控制红绿灯顺序
在创建了 Promise 对象之后,我们需要使用 Promise 方法来控制红绿灯的顺序。
示例代码如下:
function start() {
  red().then(function() {
    return green();
  }).then(function() {
    return yellow();
  }).then(function() {
    return start();
  });
}

start();
上面的代码中,我们定义了一个 start() 函数,该函数依次调用红灯、绿灯和黄灯 Promise 对象,然后再次自动调用 start() 函数,以重复上述步骤。这样就能实现红绿灯的连续闪烁。
在调用每个 Promise 对象时,我们使用了 then() 方法连接不同的 Promise 对象。then() 方法表示当前 Promise 对象完成后,执行下一个 Promise 对象。
这就是使用 Promise 实现红绿灯实例代码的过程。通过这个实例,我们可以了解到 Promise 的异步控制能力,并使代码更加简洁和易于理解。
示例说明
下面是两个使用 Promise 实现红绿灯实例代码的示例:
示例 1
在这个示例中,我们将 Promise 对象的时间都设置为 1 秒钟,以便更容易观察代码运行的过程。
function red() {
  return new Promise(function(resolve, reject) {
    setTimeout(function() {
      console.log('红灯亮起');
      resolve();
    }, 1000);
  });
}

function green() {
  return new Promise(function(resolve, reject) {
    setTimeout(function() {
      console.log('绿灯亮起');
      resolve();
    }, 1000);
  });
}

function yellow() {
  return new Promise(function(resolve, reject) {
    setTimeout(function() {
      console.log('黄灯亮起');
      resolve();
    }, 1000);
  });
}

function start() {
  red().then(function() {
    return green();
  }).then(function() {
    return yellow();
  }).then(function() {
    return start();
  });
}

start();
在运行这个示例代码时,我们可以看到红、黄、绿灯亮起的过程。这样,就可以更好地理解 Promise 的运作原理。
示例 2
在这个示例中,我们将每个 Promise 对象的持续时间设置不同,以便更好地模拟实际红绿灯的持续时间。
function red() {
  return new Promise(function(resolve, reject) {
    setTimeout(function() {
      console.log('红灯亮起,持续 10 秒');
      resolve();
    }, 10000);
  });
}

function green() {
  return new Promise(function(resolve, reject) {
    setTimeout(function() {
      console.log('绿灯亮起,持续 15 秒');
      resolve();
    }, 15000);
  });
}

function yellow() {
  return new Promise(function(resolve, reject) {
    setTimeout(function() {
      console.log('黄灯亮起,持续 5 秒');
      resolve();
    }, 5000);
  });
}

function start() {
  red().then(function() {
    return green();
  }).then(function() {
    return yellow();
  }).then(function() {
    return start();
  });
}

start();
在运行这个示例代码时,我们可以看到每个灯的亮起时间和持续时间,这样就可以更好地模拟实际的红绿灯。
 Layui treetable 复选框联动解决方案treetable.js没有checked做联动。于是自己基于treetable开发的一个小功能,希望能和大家一起交流一下。 1. 在当前HTML文档checked监听函数中增加以下代码 //联动 table.on(
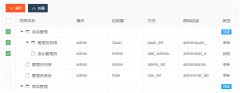
 layui扩展的树形表格treetablelayui开发时,遇到要求做成这样的树形表格的需求。这里我们要用到layui的第三方控件treetable,最终实现效果如下图所示: 引入控件: layui.config({ base: '/js/' //直接