javascript实现很浪漫的气泡冒出特效
时间:2023-12-07“javascript实现很浪漫的气泡冒出特效”是一种比较流行的前端特效,它可以将一个固定位置的元素变成很多个气泡划分开,每个气泡都有自己特有的颜色、大小和浮动速度,使得整个页面看起来非常活泼、盎然。下面就让我们详细讲解如何实现这个特效。
准备工作
在前期准备工作中,我们需要引入一个定位元素,用来放置我们的气泡,还需要引入3种颜色、不同大小和速度的气泡。在引入3种气泡的时候,需要保证它们的颜色、大小和速度是不一样的,这样才可以达到最好的效果。
<div class="container">
    <div class="bubble bubble1"></div>
    <div class="bubble bubble2"></div>
    <div class="bubble bubble3"></div>
</div>

<style>
    .container {
        width: 500px;
        height: 500px;
        position: relative;
        margin: 0 auto;
    }

    .bubble {
        width: 20px;
        height: 20px;
        position: absolute;
        border-radius: 50%;
    }

    .bubble1 {
        background-color: #F77783;
        animation: bubble 3s ease-in-out infinite;
        animation-delay: 0;
    }

    .bubble2 {
        background-color: #4CAF50;
        animation: bubble 3.5s ease-in-out infinite;
        animation-delay: 1s;
    }

    .bubble3 {
        background-color: #1E88E5;
        animation: bubble 4s ease-in-out infinite;
        animation-delay: 2s;
    }

    @keyframes bubble {
        0% {
            transform: translateY(0);
            opacity: 1;
        }

        100% {
            transform: translateY(-500px);
            opacity: 0;
        }
    }
</style>
实现过程
在实现过程中,我们主要需要使用CSS3中的animation和transform动画属性来实现气泡特效的浮动和透明度动态变化。
- 定义动态效果
在这一步中,我们需要定义气泡的浮动效果。这里,我们可以使用CSS中的animation属性。
@keyframes bubble {
    0% {
        transform: translateY(0);
        opacity: 1;
    }
    100% {
        transform: translateY(-500px);
        opacity: 0;
    }
}
这个过程中,我们使用translate动画属性来实现气泡的垂直平移。设置0%的开始状态和100%的结束状态,实现动画初始与终止的状态。
- 设置气泡的大小和颜色
在这里,我们使用CSS设置不同的气泡颜色、大小和动画时长。这里我们定义了3个不同的气泡元素,每个元素都有不同的颜色、大小和动画时长,以达到效果的多样性。
.bubble1 {
    background-color: #F77783;
    animation: bubble 3s ease-in-out infinite;
    animation-delay: 0;
}

.bubble2 {
    background-color: #4CAF50;
    animation: bubble 3.5s ease-in-out infinite;
    animation-delay: 1s;
}

.bubble3 {
    background-color: #1E88E5;
    animation: bubble 4s ease-in-out infinite;
    animation-delay: 2s;
}
最后我们将这些气泡放置在并设置相对于相对父容器进行定位的容器中。
<div class="container">
    <div class="bubble bubble1"></div>
    <div class="bubble bubble2"></div>
    <div class="bubble bubble3"></div>
</div>
示例说明
示例1
在这个例子中,我们可以在页面上看到3个不同颜色和速度的气泡在不同的时候冒出了,它们以一定的速度从底部升起,并在一定的高度上弹跳一下,达到较好的感官效果。
示例2
在这个例子中,我们将三种不同颜色和速度的气泡放置在一个半透明的方框中,又将这个方框放在一个背景透明的容器中,给人们一种视觉上的透明感,较好地融合在页面的整体环境中。
综上所述,“javascript实现很浪漫的气泡冒出特效”是一种非常好用的前端特效,它通过CSS中的animation和transform动画属性,将一个较静止的元素变成了充满活力的元素,提升了页面的整体观感。
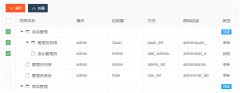 Layui treetable 复选框联动解决方案treetable.js没有checked做联动。于是自己基于treetable开发的一个小功能,希望能和大家一起交流一下。 1. 在当前HTML文档checked监听函数中增加以下代码 //联动 table.on(
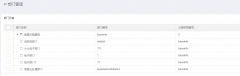 layui扩展的树形表格treetablelayui开发时,遇到要求做成这样的树形表格的需求。这里我们要用到layui的第三方控件treetable,最终实现效果如下图所示: 引入控件: layui.config({ base: '/js/' //直接