Linux����dnsmasq��dns cache server�����÷���
ʱ�䣺2016-09-25Ŀǰ���°���2.7.1 ����ȥ��FTP���أ�http://www.thekelleys.org.uk/dnsmasq/
��װ���̱Ƚϼ�
yum -y install dnsmasq*
wget http://www.keepalived.org/software/keepalived-1.2.9.tar.gz
tar zxvf keepalived-1.2.9.tar.gz
cd keepalived-1.2.9
./configure --prefix=/usr/local/keepalived
make && make install
mkdir /etc/keepalived
cp /usr/local/keepalived/etc/keepalived/keepalived.conf /etc/keepalived/
ln -s /usr/local/keepalived/etc/sysconfig/keepalived /etc/sysconfig/
ln -s /usr/local/keepalived/etc/rc.d/init.d/keepalived /etc/init.d/
ln -s /usr/local/keepalived/sbin/keepalived /usr/sbin/
chkconfig --add keepalived
chkconfig --level 35 keepalived on
keepalived�����úܼ�ֻ��Ҫ����һ��VIP��������̨Server֮��Ʈ��Ʈȥ�Ϳ���ʵ��������
! Configuration File for keepalived
global_defs {
notification_email {
xxx@xxx.com
}
notification_email_from xxx@xxx.com
smtp_server 127.0.0.1
smtp_connect_timeout 30
router_id LVS_DEVEL
}
vrrp_instance dnscache {
state MASTER // ��һ̨����BACKUP
interface eth1 // ���ĸ��ӿ��Ͻ��з�����״̬���
virtual_router_id 51
priority 180 // BACKUP����������100
advert_int 1 // ���������λΪ��
authentication {
auth_type PASS
auth_pass 1234
}
virtual_ipaddress { // VIP���ã�ָ������������
192.168.100.99/24 dev eth1
}
}
dnsmasq������Ҳ�ܼ�
resolv-file=/etc/resolv.dnsmasq.conf
cache-size=1000
conf-dir=/etc/dnsmasq.d
������dns��ַд�뵽/etc/resolv.dnsmasq.conf�ļ���
echo "nameserver 8.8.8.8" > /etc/resolv.dnsmasq.conf
���������;���������ȫ���ķ�����dns����������
echo "nameserver 192.168.100.99" > /etc/resolv.conf
���������һ̨������Server��֤һ�£�����ܽ�����˵��������.
nslookup www.google.cn 192.168.100.99
�����˷���ֻ�ʺ�С����ҵ����ģ�ٵ������ʹ�ã����������ʱ������bind��á�
�������������ѵIJ��䣺
sudo pacman -S --needed dnsmasq
cd /etc
[admin@huangye etc]$ sudo cp -v dnsmasq.conf{,.orig}
`dnsmasq.conf' -> `dnsmasq.conf.orig'
[admin@huangye etc]$ sudo vim dnsmasq.conf
�����˵��dnsmasq�����ü��ˣ�
resolv-file=/etc/dnsmasq.resolv.conf
addn-hosts=/etc/dnsmasq.hosts
local=/localnet/
no-dhcp-interface=eth0
conf-dir=/etc/dnsmasq.d
[admin@huangye etc]$ sudo cp -v resolv.conf dnsmasq.resolv.conf
Password:
`resolv.conf' -> `dnsmasq.resolv.conf'
sudo mkdir /etc/dnsmasq.d
sudo touch /etc/dnsmasq.hosts
sudo /etc/rc.d/dnsmasq start
������Ǽ���rc.conf DAEMONS,ע��Ҫ��network���档
dnsmasq �ɴӶ����hosts�ļ���ȡ��Ŀ������������������������
echo "IP��ַ ����" > /etc/dnsmasq.hosts
���⣬����dnsmasq������SIGHUP����������hosts�ļ�����������Ч��
killall -s SIGHUP dnsmasq
�鿴����״̬��
netstat -tunl
tcp 0 0 0.0.0.0:53 0.0.0.0:* LISTEN
udp 0 0 0.0.0.0:53 0.0.0.0:*
��dig һ�£������ȶ���4ms ,���Σ�ͬ�������ã�����һ̨ubuntu server 10.04 ����dig ��1ms ,���ұ��ؾ�Ȼ��4ms ,��
�������
 windows php5.5�����°�װmemcached����˵ķ����Լ� php_memcache.dll ����������ɺ�ѹ����memcachedĿ¼�ŵ�һ�����У��������Ƿ�����d��WebtoolsĿ¼�£����� DOS ������ Ȼ��ִ�з���ע������ memcached.exe -d install ж�ط���
 Memcached����ȫ�ӹ�©�������� Memcached��һ�׳��õ�key-value����ϵͳ������������û��Ȩ����ģ�飬���Կ�����������Memcache��������ױ�������ɨ�跢�֣�ͨ���������ֱ��
- memcache �˿�11211 δ��Ȩ����©��©�������� memcache��һ�׳��õ�key-value����ϵͳ������������û��Ȩ����ģ�飬���Կ�����������memcache��������ױ�������ɨ�跢�֣�ͨ���������ֱ�Ӷ�
- nginx+apache+mysql+php+memcached+squid���Ⱥweb������ǰ��LAMP����ģʽ��WEB��������ѡ����δһ����Ч���ɿ����ȶ���WEB������һֱ�Ǹ��������⣬���ľ�����������һ�γ��ԡ�
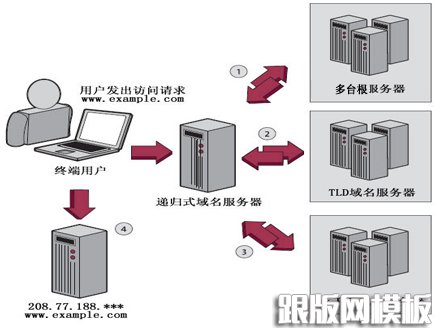 DNS�Ĺ���ԭ��ͼ��˵��ǰ��ʱ�䱩��Ӱ����DNS�����¼����´����û����������ֵ÷з��������������Ȼ�������ۡ�DNS������ʲô�أ�ΪʲôDNS���˾Ͳ���������
- ����DNS�������ļ��㷽��С�������ռ��ܽ��˼��㱣��DNS����������Ч��������Ҫ�����ѵĿ��Բο��¡�
��������
 ��վ������woff�����ļ��Ľ���취���пͻ������ڰ�װ��վ��woff��woff2���������أ���������ʾͼ���ļ����������Ҫ��ô����أ� ������Ϊ������IISĬ����û��SVG,WOFF,WOFF2�⼸���ļ����͵���չ�ģ�
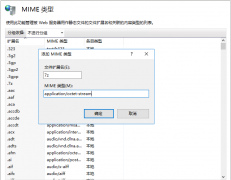 ��վ��������֧��.7z�ļ����صĽ������7-Zip��һ��ų������ֽ����ѹ���ȵ�ѹ��������������֧�ֶ��е�7z�ļ���ʽ�����һ�֧�ָ�������ѹ���ļ���ʽ�����а���ZIP, RAR, CAB, GZIP, BZIP2��TAR��������ѹ����ѹ
- ��վ��������֧��.7z�ļ����صĽ������
- ��װ Apache ����
��һ�ַ���Ȩ�������ķ�ʽ����һ���������ֵij��� - nginx����α��̬�ļ�.htaccess�İ취
- ��ô�÷�����iis6-7֧��.apk�ļ�����
- ECShop Զ�̴���ִ�и�Σ©��
- Php.ini �ļ�λ���������ô�ҵ� php.ini
- Linux �������̹��ز���
- php����Allowed memory size of 134217728 bytes exhausted����������
- �����������IP��ַ��ѯ�ӿ�(API)
- CentOS7�±��밲װtesseract-ocr����