JavaScript 图像动画的小demo
时间:2023-12-09让我来详细讲解一下“JavaScript 图像动画的小demo”的完整攻略。
1. 设计思路
通过 Canvas 创建动画效果,可以将图形动态地展示到网页上。这个小demo的设计思路就是以一只小乌龟为例,讲解如何使用 Canvas 创建动画效果。主要有以下几个步骤:
- 创建 Canvas 元素
- 获取 Canvas 画布的上下文
- 加载乌龟图片资源
- 设置画布宽高和图片起始位置
- 编写循环函数,动态更新乌龟图片
2. 示例代码解析
以下是两条示例代码的详细解析:
示例 1:创建 Canvas 元素和设置画布宽高
创建一个 id 为“myCanvas”的 Canvas 元素,并设置画布宽度和高度:
<canvas id="myCanvas" width="500" height="500"></canvas>
这里设置的画布宽高为 500 * 500。
示例 2:加载乌龟图片资源
加载乌龟图片资源,首先需要创建一个 Image 对象,并设置其源路径:
const turtle = new Image();
turtle.src = 'turtle.png';
这里的图片名称为“turtle.png”。
3. 完整代码
以下是完整的 JavaScript 图像动画小demo代码,其中包含了所有的步骤和示例说明:
<!DOCTYPE html>
<html>
  <head>
    <meta charset="utf-8">
    <title>JavaScript 图像动画的小demo</title>
  </head>
  <body>
    <canvas id="myCanvas" width="500" height="500"></canvas>
    <script>
      const canvas = document.getElementById('myCanvas');
      const ctx = canvas.getContext('2d');

      const turtle = new Image();
      turtle.src = 'turtle.png';

      turtle.onload = function() {
        let x = 0;
        let y = 200;
        const speed = 5;

        function drawTurtle() {
          ctx.clearRect(0, 0, canvas.width, canvas.height);
          ctx.drawImage(turtle, x, y, 100, 100);
          x += speed;
          if (x > canvas.width) {
            x = 0;
          }
          requestAnimationFrame(drawTurtle);
        }

        drawTurtle();
      }
    </script>
  </body>
</html>
在代码中,我们通过 canvas 元素和 getContext() 方法获取到 canvas 的上下文。然后,创建 Image 对象(turtle),并设置其源路径。通过 onload() 方法等待图片加载完成。接下来,设置画布的宽度和高度,以及乌龟起始位置。最后,编写循环函数,动态更新乌龟图片。
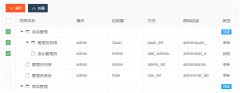 Layui treetable 复选框联动解决方案treetable.js没有checked做联动。于是自己基于treetable开发的一个小功能,希望能和大家一起交流一下。 1. 在当前HTML文档checked监听函数中增加以下代码 //联动 table.on(
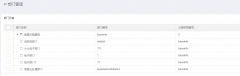 layui扩展的树形表格treetablelayui开发时,遇到要求做成这样的树形表格的需求。这里我们要用到layui的第三方控件treetable,最终实现效果如下图所示: 引入控件: layui.config({ base: '/js/' //直接