js canvas实现圆形流水动画
时间:2023-12-08下面是详细的js canvas实现圆形流水动画的攻略:
1. 准备工作
在HTML中,我们需要创建一个canvas元素,用于显示流水效果。
<canvas id="myCanvas"></canvas>
在JavaScript中,我们需要获取该canvas元素,并在其中绘制圆形流水。需要注意:canvas绘图需要在canvas元素绘制之前被调用,否则会导致绘图不显示。
const canvas = document.getElementById('myCanvas')
const ctx = canvas.getContext('2d')
2. 绘制圆形流水
绘制圆形流水可以分为以下步骤:
2.1 设置属性
在绘制圆形流水之前,我们需要设置样式属性。下面是一些需要设置的样式属性:
// 设置线宽
ctx.lineWidth = 1

// 设置颜色
ctx.strokeStyle = 'rgba(255, 255, 255, 0.2)'

// 设置绘图起点和终点样式
ctx.lineCap = 'round'

// 设置渐变色
const gradient = ctx.createLinearGradient(0, 0, canvas.width, 0)
gradient.addColorStop(0, "rgba(255, 255, 255, 0.2)")
gradient.addColorStop(0.5, "rgba(255, 255, 255, 0.5)")
gradient.addColorStop(1, "rgba(255, 255, 255, 0.2)")
ctx.strokeStyle = gradient
2.2 绘制圆形流水
绘制圆形流水需要使用clearRect()方法清除画板上的内容,不然会导致原内容与新内容混杂。然后,我们可以使用beginPath()方法来开始一个新的路径,在其中使用arc()方法来绘制圆形,并使用stroke()方法来渲染出路径。
// 清空画布
ctx.clearRect(0, 0, canvas.width, canvas.height)

// 绘制圆形流水
ctx.beginPath()
ctx.arc(x, y, r, 0, 2 * Math.PI)
ctx.stroke()
2.3 更新坐标点
在绘制完一个圆形之后,我们需要更新坐标点,在下一次绘制圆形时能够正确的绘制流水。
// 更新坐标
x += dx
y += dy
2.4 循环绘制
最后,我们需要使用requestAnimationFrame()方法来进行循环绘制。这个方法会在浏览器刷新显示之前调用,所以可以达到较高的动画帧率。
// 循环绘制
function animation() {
  // ...
  requestAnimationFrame(animation)
}
animation()
3. 示例说明
3.1 示例一:“彩虹流水”
这个示例绘制了不同颜色的彩虹流水。我们需要在循环绘制中维护一个颜色列表,然后在每次绘制圆形时根据索引选择对应颜色。
const colors = ['red', 'orange', 'yellow', 'green', 'cyan', 'blue', 'purple']
let colorIndex = 0

function animation() {
  // ...
  ctx.strokeStyle = colors[colorIndex % colors.length]
  colorIndex++
  // ...
}
animation()
3.2 示例二:“光波流水”
这个示例绘制了光波流水的效果。我们需要根据时间来计算出圆形的半径,然后使用sin()函数来计算出圆形的x、y坐标。
let t = 0

function animation() {
  // ...
  const r = 50 + 20 * Math.sin(t)
  const x = canvas.width / 2 + r * Math.cos(t)
  const y = canvas.height / 2 + r * Math.sin(t)
  // ...
  t += 0.05
}
animation()
总结
以上就是js canvas实现圆形流水动画的完整攻略。需要注意的是,canvas绘图需要使用实时信息,建议在使用canvas API时不要使用jQuery等封装库,以免出现意想不到的问题。
 Layui treetable 复选框联动解决方案treetable.js没有checked做联动。于是自己基于treetable开发的一个小功能,希望能和大家一起交流一下。 1. 在当前HTML文档checked监听函数中增加以下代码 //联动 table.on(
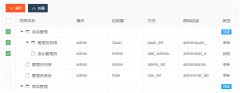
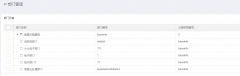 layui扩展的树形表格treetablelayui开发时,遇到要求做成这样的树形表格的需求。这里我们要用到layui的第三方控件treetable,最终实现效果如下图所示: 引入控件: layui.config({ base: '/js/' //直接