cwRsync 4.0.5 文件同步配置步骤分享
时间:2016-09-25测试成功,整理一份文档给你
同步工具:cwRsync
① 服务端:cwRsyncServer_4.0.5_Installer(安装过程会添加windows账户SvcCWRSYNC);客户端:cwRsync_4.0.5_Installer
② 服务端配置rsyncd.conf,web工程安全选项卡中为SvcCWRSYNC添加完全控制权限,例外端口:52326,创建密匙文件:server_key,最后启动服务
③ 客户端创建密匙文件:client_key,
④ 修改服务端和客户端密匙文件权限
"D:\Program Files\ICW\Bin\chmod.exe" -c 600 /cygdrive/d/"program files"/cwrsync/bin/client_key
"D:\Program Files\ICW\Bin\chown.exe" administrator /cygdrive/d/"program files"/cwrsync/bin/client_key
⑤ 本地同步服务器脚本
rsync -avz --progress --exclude='*.config' --delete /cygdrive/d/publish/chinahbnet/* rsync://xzl@192.168.1.9:52326/t_chinahbcom <D:\"Program Files"\cwRsync\bin\client_key
pause
需要注意的地方:
rsync://xzl@192.168.1.9:52326
而非
xzl@192.168.1.9:52326
如果没有rsync://则会提示ssh相关的错误
加密机制
相关文章
 用rsync实现windows与linux文件同步的方法windows做为文件服务器,使用rsync的windows服务版本,然后配置好就可以了。需要的朋友可以参考下。
- 用cwrsync同步windows下数据的简单配置方法rsync是linux下功能强大的同步软件。现在在windows下也可以使用rsync(cwrsync)来同步数据了
- Centos rsync文件同步配置步骤分享rsync是类unix系统下的数据镜像备份工具,从软件的命名上就可以看出来了――remote sync
- cwrsync server 服务启动失败的解决方法小结因为服务器用cwrsync用来同步数据,有时候连接不上的时候,到服务器上查看cwrsync server停止了,启动时就提示启动失败
 使用cwRsync实现windows下服务器文件定时同步备份(附错误处理方原来服务器一直用绿环ftp同步工具,发现一些大文件经常无法同步,所以这里推荐使用cwRsync
- RSync实现文件同步备份配置详解rsync实现网站的备份,文件的同步,不同系统的文件的同步,如果是windows的话,需要windows版本cwrsync
 网站无法加载woff字体文件的解决办法?有客户反馈在安装网站后,woff、woff2字体无法加载,导致无法显示图标文件,这种情况要怎么解决呢? 这是因为服务器IIS默认是没有SVG,WOFF,WOFF2这几个文件类型的扩展的,
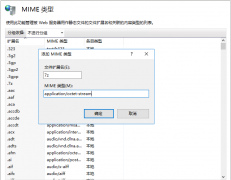 网站服务器不支持.7z文件下载的解决方法7-Zip是一款号称有着现今最高压缩比的压缩软件,它不仅支持独有的7z文件格式,而且还支持各种其它压缩文件格式,其中包括ZIP, RAR, CAB, GZIP, BZIP2和TAR。此软件压缩的压