html5 画布 - 沿路径为对象设置动画
时间:2023-08-02问题描述
我对画布有点新,如果这是一个微不足道的问题,请原谅.
I'm a bit new to canvas and such so forgive if it's a trivial question.
我希望能够按照路径(定义为贝塞尔路径)为对象设置动画,但我不知道该怎么做.
I'd like to be able to animate an object following a path (defined as bezier path) but I'm not sure how to do it.
我看过拉斐尔,但随着时间的推移,我不知道如何走这条路.
I've looked at Raphael but I can't work out how to follow the path over time.
Cake JS 在演示中看起来很有希望,但我真的很苦恼文档,或者在这种情况下缺少文档.
Cake JS looked promising in the demo, but I'm really struggling the documentation, or lack thereof in this case.
有人有这方面的工作示例吗?
Has anyone got some working example of this?
推荐答案
在我的网站上使用代码 来自 这个相关问题,但不是在回调中更改 .style.left 等,而是使用新位置的项目(以及可选的旋转)擦除并重新绘制画布.
Use the code on my website from this related question, but instead of changing the .style.left and such in the callback, erase and re-draw your canvas with the item at the new location (and optionally rotation).
请注意,这在内部使用 SVG 沿贝塞尔曲线轻松插入点,但您可以将它提供的点用于您想要的任何东西(包括在画布上绘图).
Note that this uses SVG internally to easily interpolate points along a bézier curve, but you can use the points it gives you for whatever you want (including drawing on a Canvas).
如果我的网站出现故障,这里是图书馆的当前快照:
In case my site is down, here's a current snapshot of the library:
function CurveAnimator(from,to,c1,c2){
  this.path = document.createElementNS('http://www.w3.org/2000/svg','path');
  if (!c1) c1 = from;
  if (!c2) c2 = to;
  this.path.setAttribute('d','M'+from.join(',')+'C'+c1.join(',')+' '+c2.join(',')+' '+to.join(','));
  this.updatePath();
  CurveAnimator.lastCreated = this;
}
CurveAnimator.prototype.animate = function(duration,callback,delay){
  var curveAnim = this;
  // TODO: Use requestAnimationFrame if a delay isn't passed
  if (!delay) delay = 1/40;
  clearInterval(curveAnim.animTimer);
  var startTime = new Date;
  curveAnim.animTimer = setInterval(function(){
    var now = new Date;
    var elapsed = (now-startTime)/1000;
    var percent = elapsed/duration;
    if (percent>=1){
      percent = 1;
      clearInterval(curveAnim.animTimer);
    }
    var p1 = curveAnim.pointAt(percent-0.01),
        p2 = curveAnim.pointAt(percent+0.01);
    callback(curveAnim.pointAt(percent),Math.atan2(p2.y-p1.y,p2.x-p1.x)*180/Math.PI);
  },delay*1000);
};
CurveAnimator.prototype.stop = function(){
  clearInterval(this.animTimer);
};
CurveAnimator.prototype.pointAt = function(percent){
  return this.path.getPointAtLength(this.len*percent);
};
CurveAnimator.prototype.updatePath = function(){
  this.len = this.path.getTotalLength();
};
CurveAnimator.prototype.setStart = function(x,y){
  var M = this.path.pathSegList.getItem(0);
  M.x = x; M.y = y;
  this.updatePath();
  return this;
};
CurveAnimator.prototype.setEnd = function(x,y){
  var C = this.path.pathSegList.getItem(1);
  C.x = x; C.y = y;
  this.updatePath();
  return this;
};
CurveAnimator.prototype.setStartDirection = function(x,y){
  var C = this.path.pathSegList.getItem(1);
  C.x1 = x; C.y1 = y;
  this.updatePath();
  return this;
};
CurveAnimator.prototype.setEndDirection = function(x,y){
  var C = this.path.pathSegList.getItem(1);
  C.x2 = x; C.y2 = y;
  this.updatePath();
  return this;
};
…下面是你可以使用它的方法:
…and here's how you might use it:
var ctx = document.querySelector('canvas').getContext('2d');
ctx.fillStyle = 'red';

var curve = new CurveAnimator([50, 300], [350, 300], [445, 39], [1, 106]);

curve.animate(5, function(point, angle) {
    ctx.clearRect(0, 0, ctx.canvas.width, ctx.canvas.height);
    ctx.fillRect(point.x-10, point.y-10, 20, 20);
});
实际操作:http://jsfiddle.net/Z2YSt/
这篇关于html5 画布 - 沿路径为对象设置动画的文章就介绍到这了,希望我们推荐的答案对大家有所帮助,也希望大家多多支持跟版网!
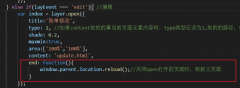 layer.open打开的页面关闭时,父页面刷新的方法layer.open打开的页面关闭时,父页面刷新的方法,在layer.open中添加: end: function(){ window.parent.location.reload();//关闭open打开的页面时,刷新父页面 }