1. <i id='oYvTz'><tr id='oYvTz'><dt id='oYvTz'><q id='oYvTz'><span id='oYvTz'><b id='oYvTz'><form id='oYvTz'><ins id='oYvTz'></ins><ul id='oYvTz'></ul><sub id='oYvTz'></sub></form><legend id='oYvTz'></legend><bdo id='oYvTz'><pre id='oYvTz'><center id='oYvTz'></center></pre></bdo></b><th id='oYvTz'></th></span></q></dt></tr></i><div id='oYvTz'><tfoot id='oYvTz'></tfoot><dl id='oYvTz'><fieldset id='oYvTz'></fieldset></dl></div>

      <bdo id='oYvTz'></bdo><ul id='oYvTz'></ul>

      <small id='oYvTz'></small><noframes id='oYvTz'>

      <tfoot id='oYvTz'></tfoot><legend id='oYvTz'><style id='oYvTz'><dir id='oYvTz'><q id='oYvTz'></q></dir></style></legend>

      如何使用画布和 javascript 像素化图像

      时间:2023-06-20
      • <tfoot id='89OfG'></tfoot>
            <bdo id='89OfG'></bdo><ul id='89OfG'></ul>

              <small id='89OfG'></small><noframes id='89OfG'>

              1. <legend id='89OfG'><style id='89OfG'><dir id='89OfG'><q id='89OfG'></q></dir></style></legend>
                <i id='89OfG'><tr id='89OfG'><dt id='89OfG'><q id='89OfG'><span id='89OfG'><b id='89OfG'><form id='89OfG'><ins id='89OfG'></ins><ul id='89OfG'></ul><sub id='89OfG'></sub></form><legend id='89OfG'></legend><bdo id='89OfG'><pre id='89OfG'><center id='89OfG'></center></pre></bdo></b><th id='89OfG'></th></span></q></dt></tr></i><div id='89OfG'><tfoot id='89OfG'></tfoot><dl id='89OfG'><fieldset id='89OfG'></fieldset></dl></div>
                  <tbody id='89OfG'></tbody>

                本文介绍了如何使用画布和 javascript 像素化图像的处理方法,对大家解决问题具有一定的参考价值,需要的朋友们下面随着跟版网的小编来一起学习吧!

                问题描述

                我一直在用画布元素做一些试验,很好奇如何实现效果.

                I've been experimenting a bit with the canvas element and was curious how to pull off an effect.

                我从一系列教程和演示中得到了一些我想要的东西,但我需要一些帮助才能完成剩下的工作.我正在寻找的是在 mouseover 上像素化图像,然后在 mouseout 上重新聚焦/取消像素化.当鼠标悬停在 http://www.cropp.com/主轮播下方的块.

                I've somewhat got what I'm looking for from a collection of tutorials and demos, but I need some assistance getting the rest of the way there. What I'm looking for is to pixelate an image on mouseover, then refocus/un-pixelate it on mouseout. You can see a good example of the effect at http://www.cropp.com/ when mousing over the blocks that are below the main carousel.

                这是我开始的指向小提琴的链接.小提琴不起作用,因为您不能使用跨域图像(womp womp),但到目前为止您仍然可以看到我的代码.当将鼠标悬停在我的画布对象上时,我可以对图像进行像素化,但这有点倒退到我想要得到的东西.任何帮助或建议将不胜感激.

                Here is a link to a fiddle I started. The fiddle won't work because you can't use cross domain images (womp womp), but you can still see my code thus far. When mousing over my canvas object I'm able to pixelate the image, but it's kind of backwards to what I'm attempting to get. Any help or advice would be greatly appreciated.

                var pixelation = 40,
                    fps = 120,
                    timeInterval = 1000 / fps, 
                    canvas = document.getElementById('photo'),
                    context = canvas.getContext('2d'),
                    imgObj = new Image();
                
                imgObj.src = 'images/me.jpg';
                imgObj.onload = function () {    
                    context.drawImage(imgObj, 0, 0);
                };
                
                canvas.addEventListener('mouseover', function() {
                    var interval = setInterval(function () {
                        context.drawImage(imgObj, 0, 0);
                
                        if (pixelation < 1) {
                            clearInterval(interval);
                            pixelation = 40;
                        } else {
                            pixelate(context, canvas.width, canvas.height, 0, 0);
                        }
                    }, timeInterval);
                });
                
                function pixelate(context, srcWidth, srcHeight, xPos, yPos) {
                
                    var sourceX = xPos,
                        sourceY = yPos,
                        imageData = context.getImageData(sourceX, sourceY, srcWidth, srcHeight),
                        data = imageData.data;
                
                    for (var y = 0; y < srcHeight; y += pixelation) {
                        for (var x = 0; x < srcWidth; x += pixelation) {
                
                            var red = data[((srcWidth * y) + x) * 4],
                                green = data[((srcWidth * y) + x) * 4 + 1],
                                blue = data[((srcWidth * y) + x) * 4 + 2];
                
                            for (var n = 0; n < pixelation; n++) {
                                for (var m = 0; m < pixelation; m++) {
                                    if (x + m < srcWidth) {
                                        data[((srcWidth * (y + n)) + (x + m)) * 4] = red;
                                        data[((srcWidth * (y + n)) + (x + m)) * 4 + 1] = green;
                                        data[((srcWidth * (y + n)) + (x + m)) * 4 + 2] = blue;
                                    }
                                }
                            }
                        }
                    }
                
                    // overwrite original image
                    context.putImageData(imageData, xPos, yPos);
                    pixelation -= 1;
                }
                

                推荐答案

                您不需要迭代像素缓冲区来创建像素化效果.

                You don't need to iterate pixel buffer to create a pixelating effect.

                只需关闭图像平滑并将图像的小版本放大到画布即可.这也意味着您可以使用任何图像作为源(CORS-wise).

                Simply turn off image smoothing and enlarge a small version of the image to the canvas. This will also mean you can use any image as source (CORS-wise).

                示例:

                小提琴演示

                // get a block size (see demo for this approach)
                var size = blocks.value / 100,
                    w = canvas.width * size,
                    h = canvas.height * size;
                
                // draw the original image at a fraction of the final size
                ctx.drawImage(img, 0, 0, w, h);
                
                // turn off image aliasing
                ctx.msImageSmoothingEnabled = false;
                ctx.mozImageSmoothingEnabled = false;
                ctx.webkitImageSmoothingEnabled = false;
                ctx.imageSmoothingEnabled = false;
                
                // enlarge the minimized image to full size    
                ctx.drawImage(canvas, 0, 0, w, h, 0, 0, canvas.width, canvas.height);
                

                在演示中,您可以对这个效果进行动画处理,以看到与像素迭代方法相比性能非常好,因为浏览器会在编译代码内部处理像素化".

                In the demo you can animate this effect to see that the performance is very good compared to an pixel iterating method as the browser takes care of the "pixelation" internally in compiled code.

                这篇关于如何使用画布和 javascript 像素化图像的文章就介绍到这了,希望我们推荐的答案对大家有所帮助,也希望大家多多支持跟版网!
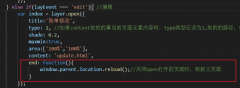
                上一篇:addEventListener 用于 Canvas 上的 keydown 下一篇:及时绘制 HTML5/Javascript 画布路径

                相关文章

                  <bdo id='h2kxt'></bdo><ul id='h2kxt'></ul>

                <i id='h2kxt'><tr id='h2kxt'><dt id='h2kxt'><q id='h2kxt'><span id='h2kxt'><b id='h2kxt'><form id='h2kxt'><ins id='h2kxt'></ins><ul id='h2kxt'></ul><sub id='h2kxt'></sub></form><legend id='h2kxt'></legend><bdo id='h2kxt'><pre id='h2kxt'><center id='h2kxt'></center></pre></bdo></b><th id='h2kxt'></th></span></q></dt></tr></i><div id='h2kxt'><tfoot id='h2kxt'></tfoot><dl id='h2kxt'><fieldset id='h2kxt'></fieldset></dl></div>
                1. <legend id='h2kxt'><style id='h2kxt'><dir id='h2kxt'><q id='h2kxt'></q></dir></style></legend>

                    <small id='h2kxt'></small><noframes id='h2kxt'>

                  1. <tfoot id='h2kxt'></tfoot>