Konva - 使用旋转并保持在界限内
时间:2023-06-20问题描述
我正在使用 Konva 在网页上创建一个区域.我为我的矩形创建了一个 dragBoundFunc 函数,检查 pos.x 和 pos.y 以及 canvas 和 rect 的宽度,这工作正常 - 矩形仅在拖动时停留在该区域中.
I am using Konva to create an area on a webpage. I create a dragBoundFunc function for my rectangle checking pos.x and pos.y and width of canvas and rect and this works fine - the rectangle only stays in this area as I want it to when dragged.
当我将矩形旋转 90 度时,我的问题就出现了.现在,当我检查 getClientRect().width 和 getClientRect().height 时,宽度小于高度,这是预期的,但它现在不会一直拖到画布的末端,除非我检测到旋转结束并更改我的形状 offsetY将值设置为 65,然后它就可以正常工作了.
My problem comes when I rotate the rectangle 90 degrees. Now width is less than height when I check getClientRect().width and getClientRect().height which is expected but it now won't drag all the way to the end of my canvas unless I detect end of rotation and change my shapes offsetY value to 65 and then it works fine.
旋转后更改 offsetY 和 offsetX 是否是解决此问题的正确方法,如果是,我如何计算将它们设置为什么?
Is changing offsetY and offsetX after rotation the right approach to fix this problem and how do I calculate what to set them to if yes?
           dragBoundFunc: function(pos) {
        var iw = 600 - (my_shape.getClientRect().width);
        var ih = 400 - my_shape.getClientRect().height;
        var newX = pos.x > iw  ? iw : pos.x;
        var newY = pos.y > ih ? ih : pos.y;
        return {
            x: newX > 0 ? newX : 0,
            y: newY > 0 ? newY : 0
        };

    }
推荐答案
这是一个可行的解决方案.请注意,这仅适用于 0、90、180 和 270 度或倍数的固定旋转.任意角度旋转"的解决方案;将需要三角或矩阵数学来计算点的旋转值等.
Here is a working solution. Note that this works only for fixed rotations of 0, 90, 180 and 270 degrees or multiples. A solution for 'any-angle-of-rotation; would require trig or matrix maths to compute rotated values of the point, etc.
/*
 This is the drag bounds func
*/
function theDragFunc(pos) {

var thisRect = {x: this.x(), y: this.y(), width: this.width(), height: this.height()};

// copy the boundary rect into a testRect which defines the extent of the dragbounds
// without accounting for the width and height of dragging rectangle.
// This is changed below depending on rotation.
var testRect={
  left: boundary.x,
  top: boundary.y,
  right: boundary.x + boundary.width,
  bottom: boundary.y + boundary.height
};


// the userRotation value is calculated in the rotation button onclick
// to be one of 0, 90, 180, 270
switch (userRotation){

  case 0: // for 0 degrees compute as per a normal bounds rect
    testRect.right = testRect.right - thisRect.width;
    testRect.bottom = testRect.bottom - thisRect.height;
    break;

  case 90:  // for 90 degs we have to modify the test boundary left and bottom
    testRect.left = testRect.left + thisRect.height;
    testRect.bottom = testRect.bottom - thisRect.width;
    break;

  case 180:  // for 180 degs we have to modify the test boundary left and top
    testRect.left = testRect.left + thisRect.width;
    testRect.top = testRect.top + thisRect.height;
    break;

  case 270:  // for 270 degs we have to modify the test boundary right and top
    testRect.right = testRect.right - thisRect.height;
    testRect.top = testRect.top + thisRect.width;
    break;

}

// get new pos as: if pos inside bounday ranges then use it, otherwise user boundary

// left edge check
var newX = (pos.x < testRect.left ? testRect.left : pos.x);

// right edge check
newX = (newX > testRect.right ? testRect.right : newX);

// top edge check
var newY = (pos.y < testRect.top ? testRect.top : pos.y);

// bottom edge check
newY = (newY > testRect.bottom ? testRect.bottom : newY);

// return the point we calculated
return {
    x: newX,
    y: newY
  }
}

// From here on is just the canvas setup etc.


// set ub the main rect - the one we drag and rotate
var target = {x: 70, y: 70, width: 70, height: 40};

// set ub the boundary rect - used in the rectfunc later
var boundary = {x: 20, y: 20, width: 460, height: 160};

// Set up the stage
var s1 = new Konva.Stage({container: 'container1', width: 500, height: 200});

// add a layer.
var layer1 = new Konva.Layer({draggable: false});
s1.add(layer1);

// show the extent of the boundary
var funcRect = new Konva.Rect({
    x:boundary.x,
    y: boundary.y,
    width: boundary.width,
    height: boundary.height,
    stroke: 'red'})
layer1.add(funcRect)

// Make some easy-to-grok values for the boundary func.
boundary.minX =  boundary.x;
boundary.maxX =  boundary.x + boundary.width;
boundary.minY =  boundary.y;
boundary.maxY =  boundary.y + boundary.height;

// show the target rect

var targetRect = new Konva.Rect({
    x:target.x,
    y: target.y,
    width: target.width,
    height: target.height,
    stroke: 'green',
    draggable: true,

    // Apply a linear graient fill to give a sense of rotation.
    fillLinearGradientStartPoint: { x : -50, y : -50},
    fillLinearGradientEndPoint: { x : 50, y : 50},
    fillLinearGradientColorStops: [0, 'red', 1, 'yellow'],

    dragBoundFunc: theDragFunc  // the function is at the bottom top of the code

    })
layer1.add(targetRect)

// Draw the stage
s1.draw();

var userRotation = 0;
$('#btnRotate').on('click', function(e){

  targetRect.rotate(90)
  s1.draw();

  var rectRotation = targetRect.rotation();

  // user can rotate > 360 so we will nomalise the rotation down to range 0 - 270
  userRotation = (rectRotation / 90);
  userRotation = (userRotation  % 4) * 90;

  $('#info').html("Rect rotation " + rectRotation + " same as " + userRotation);

})
p
{
padding: 4px;
}
#container1
{
display: inline-block;
width: 500px;
height: 200px;
background-color: silver;
overflow: hidden;
}
#pallette
{
height: 52px; width: 500px;
border: 1px solid #666;
margin-bottom: 10px;
z-index: 10;
}
.draggable
{
width:50px;
height: 50px;
display: inline-block;
border: 1px solid #666;
}<script src="https://ajax.googleapis.com/ajax/libs/jquery/2.1.1/jquery.min.js"></script>
<script src="https://cdn.rawgit.com/konvajs/konva/1.6.5/konva.min.js"></script>
<p>Drag bounds function on rotated rect. Red rectangle is the extent of the bounds function. Drag the rect to the boundary and notice it is captured. Now click to rotate by 90%. A simple rect-based dragFunc would fail because the origin of the rect is not top-right. The solution function solves this.
</p>
<p>
<button id='btnRotate'>Rotate by +90 degrees</button> <span id='info'>0</span> degrees.
</p>
<div id='container1'></div>这篇关于Konva - 使用旋转并保持在界限内的文章就介绍到这了,希望我们推荐的答案对大家有所帮助,也希望大家多多支持跟版网!
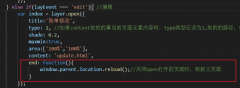 layer.open打开的页面关闭时,父页面刷新的方法layer.open打开的页面关闭时,父页面刷新的方法,在layer.open中添加: end: function(){ window.parent.location.reload();//关闭open打开的页面时,刷新父页面 }