JS实现视频弹幕效果
时间:2023-12-08下面是 JS 实现视频弹幕效果的完整攻略:
准备工作
首先,我们需要准备好以下两个文件:
- 视频文件
- 弹幕 JSON 文件
其中,弹幕 JSON 文件应该包含以下字段:
- text:弹幕文本内容
- time:弹幕出现时间,单位为秒
- color:弹幕颜色,可以是颜色代码或颜色名称
实现步骤
- 在 HTML 中添加视频和画布元素
在 HTML 中添加一个video元素和一个canvas元素,用于播放视频和渲染弹幕。例如:
<video src="video.mp4"></video>
<canvas></canvas>
- 解析弹幕数据
在 JS 中使用 Ajax 加载弹幕 JSON 文件并解析数据,得到一个包含弹幕信息的数组。
const xhr = new XMLHttpRequest();
xhr.onreadystatechange = function() {
  if (xhr.readyState === 4 && xhr.status === 200) {
    const data = JSON.parse(xhr.responseText);
    renderDanmaku(data);
  }
};
xhr.open('GET', 'danmaku.json');
xhr.send();
- 渲染弹幕
在canvas上使用fillText()方法渲染单条弹幕。解析时记录每条弹幕的出现时间,通过requestAnimationFrame()方法来控制每秒渲染的弹幕数量。
let currentIndex = 0;
function renderDanmaku(data) {
  const canvas = document.querySelector('canvas');
  const context = canvas.getContext('2d');

  const update = () => {
    context.clearRect(0, 0, canvas.width, canvas.height);
    const currentTime = video.currentTime;
    while (data[currentIndex].time < currentTime) {
      const danmaku = data[currentIndex];
      context.fillStyle = danmaku.color;
      context.fillText(danmaku.text, canvas.width, getRandomY());
      currentIndex += 1;
      if (currentIndex >= data.length) {
        break;
      }
    }
    requestAnimationFrame(update);
  };
  update();
}
- 控制弹幕显示隐藏
我们可以在canvas上绘制不可见的背景图像并在其上叠加可见弹幕,通过控制canvas的透明度来实现弹幕的显示和隐藏。
const backgroundImage = new Image();
backgroundImage.src = 'background.png';
backgroundImage.onload = () => {
  const alpha = 0.7;
  const drawBg = () => {
    context.drawImage(backgroundImage, 0, 0, canvas.width, canvas.height);
    context.fillStyle = `rgba(0, 0, 0, ${1 - alpha})`;
    context.fillRect(0, 0, canvas.width, canvas.height);
    requestAnimationFrame(drawBg);
  };
  drawBg();
};
- 输入弹幕
我们可以在页面中添加一个输入框和一个发送按钮,通过监听输入框的keydown事件并将输入加入数据数组,在canvas上渲染新添加的弹幕。
const input = document.querySelector('#input');
const send = document.querySelector('#send');
send.addEventListener('click', () => {
  const text = input.value;
  const currentTime = video.currentTime;
  const danmaku = {
    text: text,
    time: currentTime + 1,  // 延迟一秒出现
    color: '#ffffff'
  };
  data.push(danmaku);
  input.value = '';
  renderDanmaku(data);
});
至此,我们就成功实现了 JS 实现视频弹幕效果的攻略。
下面是一些示例代码,可以帮助你更好地理解上述实现步骤:
示例 1:绘制单条弹幕
const canvas = document.querySelector('canvas');
const context = canvas.getContext('2d');

const danmaku = {
  text: '这是一条弹幕',
  time: 10,
  color: '#ffffff'
};

context.fillStyle = danmaku.color;
context.textAlign = 'end';
context.fillText(danmaku.text, canvas.width, canvas.height / 2);
示例 2:控制弹幕显示隐藏
const canvas = document.querySelector('canvas');
const context = canvas.getContext('2d');

const backgroundImage = new Image();
backgroundImage.src = 'background.png';
backgroundImage.onload = () => {
  const alpha = 0.7;
  const drawBg = () => {
    context.drawImage(backgroundImage, 0, 0, canvas.width, canvas.height);
    context.fillStyle = `rgba(0, 0, 0, ${1 - alpha})`;
    context.fillRect(0, 0, canvas.width, canvas.height);
    requestAnimationFrame(drawBg);
  };
  drawBg();
};
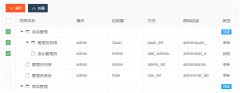 Layui treetable 复选框联动解决方案treetable.js没有checked做联动。于是自己基于treetable开发的一个小功能,希望能和大家一起交流一下。 1. 在当前HTML文档checked监听函数中增加以下代码 //联动 table.on(
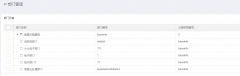 layui扩展的树形表格treetablelayui开发时,遇到要求做成这样的树形表格的需求。这里我们要用到layui的第三方控件treetable,最终实现效果如下图所示: 引入控件: layui.config({ base: '/js/' //直接