织梦cms内容页实现图片点击放大的效果
时间:2017-07-28首先引入jquery及 lighter js你可以下载换成最新的版本
可以到他们的官网下载或者下载我发的附件 jquery.lighter.zip
附件中没有第一个js文件 你自己到他官网下载 或者直接引用他们官网的。
模板中修改
{dede:field.body}
|
修 改后的代码,没什么技术含量就是正则替换在 img图片前面加一个超链接 ,其中 可以修改成任意的你自己的代码,其实a中还可以加入两个参数;data-height=’720′ 以及data-width=’1280′两个,至于这两个的效果可以到官方去看,网址:http://ksylvest.github.io/jquery-lighter/
{dede:field.body runphp="yes"}
$a = @me;$a = preg_replace('/<s*imgs+[^>]*?srcs*=s*('|")(.*?)\1[^>]*?/?s*>/i','<a data-lighter="\2″ href="\2″><img src="\2″> </a>',$a);@me = $a;
{/dede:field.body}
|
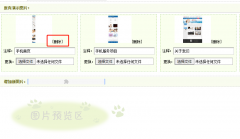
经过上面的修改后就可以实现效果了,如果想实现第一个图片中的“小图片在左边然后点击放大图片的效果 ”只需要在你的css代码中插入
.content .bdimg{display: block;float: left;margin-right: 3.57866%;width: 22.316%; }
.content .bdimg:last-child {margin-right: 0; }
.content .bdimg img {width: 100%; }
|
就可以了, 其中content及bdimg换成你自己的。
如果还想实现上一幅图片 下一幅图片,建议到人家官网研究 。
竣工。
 dedecms织梦文档内容自动关联tag标签加入内链的方法最终实现效果如下图:内容生成之后会自动加上本篇文章的tags标签(文档生成时候自动加入,编辑器中内容实际没加入,更有利) 实现教程 1、后台-系统-核心设置-关键字替换,
 dedecms织梦图集删除图片提示已删除但是实际未删除的解决办法我们传图集后需要对图片进行删除,但是系统提示已删除,实际还保存在网站目录里,这个要怎么解决呢? 打开 \dede\swfupload.php 找到 if(!file_exists($imgfile) !is_dir($