<i id='Xy8Zq'><tr id='Xy8Zq'><dt id='Xy8Zq'><q id='Xy8Zq'><span id='Xy8Zq'><b id='Xy8Zq'><form id='Xy8Zq'><ins id='Xy8Zq'></ins><ul id='Xy8Zq'></ul><sub id='Xy8Zq'></sub></form><legend id='Xy8Zq'></legend><bdo id='Xy8Zq'><pre id='Xy8Zq'><center id='Xy8Zq'></center></pre></bdo></b><th id='Xy8Zq'></th></span></q></dt></tr></i><div id='Xy8Zq'><tfoot id='Xy8Zq'></tfoot><dl id='Xy8Zq'><fieldset id='Xy8Zq'></fieldset></dl></div>
      <tfoot id='Xy8Zq'></tfoot>

      <legend id='Xy8Zq'><style id='Xy8Zq'><dir id='Xy8Zq'><q id='Xy8Zq'></q></dir></style></legend>

        <bdo id='Xy8Zq'></bdo><ul id='Xy8Zq'></ul>
    1. <small id='Xy8Zq'></small><noframes id='Xy8Zq'>

      1. 如何在 Angular 7 的表格中添加行组件?

        时间:2023-09-30
        <legend id='8xaKn'><style id='8xaKn'><dir id='8xaKn'><q id='8xaKn'></q></dir></style></legend>

          <tbody id='8xaKn'></tbody>
        <i id='8xaKn'><tr id='8xaKn'><dt id='8xaKn'><q id='8xaKn'><span id='8xaKn'><b id='8xaKn'><form id='8xaKn'><ins id='8xaKn'></ins><ul id='8xaKn'></ul><sub id='8xaKn'></sub></form><legend id='8xaKn'></legend><bdo id='8xaKn'><pre id='8xaKn'><center id='8xaKn'></center></pre></bdo></b><th id='8xaKn'></th></span></q></dt></tr></i><div id='8xaKn'><tfoot id='8xaKn'></tfoot><dl id='8xaKn'><fieldset id='8xaKn'></fieldset></dl></div>

          <small id='8xaKn'></small><noframes id='8xaKn'>

              1. <tfoot id='8xaKn'></tfoot>
                  <bdo id='8xaKn'></bdo><ul id='8xaKn'></ul>
                • 本文介绍了如何在 Angular 7 的表格中添加行组件?的处理方法,对大家解决问题具有一定的参考价值,需要的朋友们下面随着跟版网的小编来一起学习吧!

                  问题描述

                  我使用了最新版本的 angular.(7.2.0)我有个人 tr 组件,例如:

                  I use last version of angluar. (7.2.0) I have personal tr component like:

                  import { Component, OnInit, Input } from '@angular/core';
                  
                  @Component({
                  selector: 'app-table-row',
                  templateUrl: './table-row.component.html',
                  styleUrls: ['./table-row.component.scss']
                  })
                  export class TableRowComponent implements OnInit {
                  @Input() character: any;
                  @Input() columns: string[];
                  
                  constructor() { }
                  
                  ngOnInit() {
                  }
                  
                  }
                  

                  我想在表格中使用这个组件,例如:

                  I want to use this component inside table like:

                  <table class="mat-elevation-z8">
                  <tr>
                     <th *ngFor="let c of columns">{{c}}</th>
                  </tr>
                  <tr app-table-row class="component-style table-row-component" *ngFor="let ch of characters | async" 
                     [character]="ch" 
                    [columns]="columns">
                  </tr>
                  
                  </table>
                  

                  得到如下错误:

                  Can't bind to 'character' since it isn't a known property of 'tr'. ("table-row class="component-style table-row-component" *ngFor="let ch of characters | async" 
                         [ERROR ->][character]="ch" 
                        [columns]="columns">
                    </tr>
                  "): ng:///AppModule/TableComponent.html@7:7
                  

                  如何在表格中正确添加我的组件?

                  How to add my component correctly inside table?

                  推荐答案

                  将组件选择器定义为带方括号的属性选择器:

                  Define the component selector as an attribute selector with square brackets:

                  @Component({
                    selector: 'tr[app-table-row]',
                    ...
                  })
                  

                  以便可以将其设置为 tr 元素的属性:

                  so that it can be set as an attribute of the tr element:

                  <tr app-table-row ...>
                  

                  这篇关于如何在 Angular 7 的表格中添加行组件?的文章就介绍到这了,希望我们推荐的答案对大家有所帮助,也希望大家多多支持跟版网!
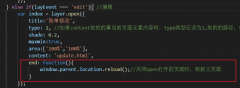
                  上一篇:如何使用从 api 获取的反应组件? 下一篇:根据条件渲染 JSX 元素

                  相关文章

                    <tfoot id='3PvZ2'></tfoot>

                  1. <small id='3PvZ2'></small><noframes id='3PvZ2'>

                    <legend id='3PvZ2'><style id='3PvZ2'><dir id='3PvZ2'><q id='3PvZ2'></q></dir></style></legend>

                    <i id='3PvZ2'><tr id='3PvZ2'><dt id='3PvZ2'><q id='3PvZ2'><span id='3PvZ2'><b id='3PvZ2'><form id='3PvZ2'><ins id='3PvZ2'></ins><ul id='3PvZ2'></ul><sub id='3PvZ2'></sub></form><legend id='3PvZ2'></legend><bdo id='3PvZ2'><pre id='3PvZ2'><center id='3PvZ2'></center></pre></bdo></b><th id='3PvZ2'></th></span></q></dt></tr></i><div id='3PvZ2'><tfoot id='3PvZ2'></tfoot><dl id='3PvZ2'><fieldset id='3PvZ2'></fieldset></dl></div>
                    • <bdo id='3PvZ2'></bdo><ul id='3PvZ2'></ul>