CSS 80 的 TRON 网格
时间:2023-08-02问题描述
我想用 CSS 构建一个80 年代 TRON 网格"效果,但在将它放到我想要的地方时遇到了一些问题.
像
我的要求:
- 将一侧淡化为透明
- 把它打包成一个漂亮的
.class放在任何<element>上就可以了
我用 2 种不同的技术对此进行了 2 次尝试.
80 年代 Grid #1(伪选择器)
https://codepen.io/oneezy/pen/MPQWBE
虽然这很有效,但每次我想要效果时在我的 html 中放置 10 个 <div> 并不理想.
body { 背景:黑色;}.grid-container {位置:绝对;宽度:200%;高度:100vh;底部:0;左:-50%;溢出:隐藏;变换:透视(200px)旋转X(40度)缩放(1)平移Z(0);变换原点:底部;填充:1px;-webkit-background-clip:内容框;-webkit-backface-visibility:隐藏;轮廓:1px纯透明;will-change:变换;}.grid-line { 高度:100%;宽度:100%;位置:绝对;}.grid-line:之前,.grid-line:after { content: "";显示:块;位置:绝对;}.grid-line:before { 高度:5px;宽度:100%;背景:蓝色;}.grid-line:after { height: 100%;宽度:5px;背景图像:线性渐变(透明,蓝色);}.grid-line:nth-child(1):before { top: 0%;不透明度:0;}.grid-line:nth-child(2):before { top: 10%;不透明度:0;}.grid-line:nth-child(3):before { top: 20%;不透明度:0.3;}.grid-line:nth-child(4):before { top: 30%;不透明度:0.4;}.grid-line:nth-child(5):before { top: 40%;不透明度:0.5;}.grid-line:nth-child(6):before { top: 50%;不透明度:0.6;}.grid-line:nth-child(7):before { top: 60%;不透明度:0.7;}.grid-line:nth-child(8):before { top: 70%;不透明度:0.8;}.grid-line:nth-child(9):before { top: 80%;不透明度:0.9;}.grid-line:nth-child(10):before { top: 90%;不透明度:1;}.grid-line:nth-child(11):before { top: calc(100% - 3px);}.grid-line:nth-child(1):after { left: 0%;}.grid-line:nth-child(2):after { left: 10%;}.grid-line:nth-child(3):after { left: 20%;}.grid-line:nth-child(4):after { left: 30%;}.grid-line:nth-child(5):after { left: 40%;}.grid-line:nth-child(6):after { left: 50%;}.grid-line:nth-child(7):after { left: 60%;}.grid-line:nth-child(8):after { left: 70%;}.grid-line:nth-child(9):after { left: 80%;}.grid-line:nth-child(10):after { left: 90%;}.grid-line:nth-child(11):after { left: calc(100% - 3px);}<section class="grid-container"><div class="grid-line"></div><div class="grid-line"></div><div class="grid-line"></div><div class="grid-line"></div><div class="grid-line"></div><div class="grid-line"></div><div class="grid-line"></div><div class="grid-line"></div><div class="grid-line"></div><div class="grid-line"></div><div class="grid-line"></div></section>80 年代网格 #2(线性渐变)
https://codepen.io/oneezy/pen/OaQNPe
这种技术非常理想,因为它允许我在 1 个 <element> 上使用 1 个 .class,但我不知道如何使它淡出.
body { 背景:黑色;}.grid-container { 宽度:100%;位置:绝对;底部:0;左:0;}.grid-container:在 {变换:透视(200px)旋转X(40度)缩放(2,1)平移Z(0);内容: "";显示:块;位置:绝对;底部:0;左:0;右:0;宽度:100%;高度:100vh;填充:1px;-webkit-background-clip:内容框;-webkit-backface-visibility:隐藏;轮廓:1px纯透明;变换原点:底部中心;will-change:变换;}.grid-container:在 {背景位置:中心底部;背景尺寸:40px 40px;背景图:线性渐变(向右,蓝色 1px,透明 0),线性渐变(到底部,蓝色 3px,透明 0);}<section class="grid-container"></section>提前感谢您的建议:D
您可以使用带有 alpha 渐变的 mask-image 来实现您想要的效果.
.grid-container:after {-webkit-mask-image: -webkit-gradient(linear, left 90%, left top, from(rgba(0,0,0,1)), to(rgba(0,0,0,0)));掩码图像:渐变(线性,左 90%,左上角,从(rgba(0,0,0,1)),到(rgba(0,0,0,0)));}看这里:https://codepen.io/JoahG/pen/QJQdJB
I'm wanting to build an "80's TRON Grid" effect with CSS but I'm running into a few issues with getting it where I want it.
Stuff like this.
My Requirements:
- Fade 1 side to transparent
- Package it up into a nice
.classto put on any<element>and it just work
I've made 2 attempts at this w/ 2 different techniques.
80's Grid #1 (pseudo selectors)
https://codepen.io/oneezy/pen/MPQWBE
Although this works perfectly, it's not ideal to put 10 <div>'s in my html every time I want the effect.
body { background: black; }

.grid-container {
	position: absolute; width: 200%; height: 100vh; bottom: 0; left: -50%; overflow: hidden;
	transform: perspective(200px) rotateX(40deg) scale(1) translateZ(0);
	transform-origin: bottom;
	padding: 1px;
	-webkit-background-clip: content-box;
	-webkit-backface-visibility: hidden;
	outline: 1px solid transparent;
	will-change: transform;
}

.grid-line { height: 100%; width: 100%; position: absolute; }


.grid-line:before,
.grid-line:after  { content: ""; display: block; position: absolute; }
.grid-line:before { height: 5px; width: 100%; background: blue; }
.grid-line:after  { height: 100%; width: 5px; background-image: linear-gradient(transparent, blue); }

.grid-line:nth-child(1):before  { top: 0%;  opacity: 0; }
.grid-line:nth-child(2):before  { top: 10%; opacity: 0; }
.grid-line:nth-child(3):before  { top: 20%; opacity: .3; }
.grid-line:nth-child(4):before  { top: 30%; opacity: .4; }
.grid-line:nth-child(5):before  { top: 40%; opacity: .5; }
.grid-line:nth-child(6):before  { top: 50%; opacity: .6; }
.grid-line:nth-child(7):before  { top: 60%; opacity: .7; }
.grid-line:nth-child(8):before  { top: 70%; opacity: .8; }
.grid-line:nth-child(9):before  { top: 80%; opacity: .9; }
.grid-line:nth-child(10):before { top: 90%; opacity: 1; }
.grid-line:nth-child(11):before { top: calc(100% - 3px); }


.grid-line:nth-child(1):after  { left: 0%;  }
.grid-line:nth-child(2):after  { left: 10%; }
.grid-line:nth-child(3):after  { left: 20%; }
.grid-line:nth-child(4):after  { left: 30%; }
.grid-line:nth-child(5):after  { left: 40%; }
.grid-line:nth-child(6):after  { left: 50%; }
.grid-line:nth-child(7):after  { left: 60%; }
.grid-line:nth-child(8):after  { left: 70%; }
.grid-line:nth-child(9):after  { left: 80%; }
.grid-line:nth-child(10):after { left: 90%; }
.grid-line:nth-child(11):after { left: calc(100% - 3px); }
<section class="grid-container">
	<div class="grid-line"></div>
	<div class="grid-line"></div>
	<div class="grid-line"></div>
	<div class="grid-line"></div>
	<div class="grid-line"></div>
	<div class="grid-line"></div>
	<div class="grid-line"></div>
	<div class="grid-line"></div>
	<div class="grid-line"></div>
	<div class="grid-line"></div>
	<div class="grid-line"></div>
</section>
80's Grid #2 (linear-gradient)
https://codepen.io/oneezy/pen/OaQNPe
This technique is ideal because it allows me to use 1 .class on 1 <element>, but I'm not sure how to make it fade out.
body { background: black; }

.grid-container { width: 100%; position: absolute; bottom: 0; left: 0; }

.grid-container:after {

	transform: perspective(200px) rotateX(40deg) scale(2,1) translateZ(0);
  content: ""; display: block; position: absolute; bottom: 0; left: 0; right: 0; width: 100%; height: 100vh;
  padding: 1px;
  -webkit-background-clip: content-box;
  -webkit-backface-visibility: hidden;
  outline: 1px solid transparent;
  transform-origin: bottom center;
  will-change: transform;
}

.grid-container:after {
  background-position: center bottom;
  background-size: 40px 40px;
  background-image:
  linear-gradient(to right, blue 1px, transparent 0),
  linear-gradient(to bottom, blue 3px, transparent 0);
}
<section class="grid-container">
</section>
Thanks in advance for your suggestions :D
You can use mask-image with an alpha gradient to achieve the effect you're looking for.
.grid-container:after {
   -webkit-mask-image: -webkit-gradient(linear, left 90%, left top, from(rgba(0,0,0,1)), to(rgba(0,0,0,0)));
   mask-image: gradient(linear, left 90%, left top, from(rgba(0,0,0,1)), to(rgba(0,0,0,0)));
}
Take a look here: https://codepen.io/JoahG/pen/QJQdJB
这篇关于CSS 80 的 TRON 网格的文章就介绍到这了,希望我们推荐的答案对大家有所帮助,也希望大家多多支持跟版网!
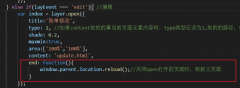 layer.open打开的页面关闭时,父页面刷新的方法layer.open打开的页面关闭时,父页面刷新的方法,在layer.open中添加: end: function(){ window.parent.location.reload();//关闭open打开的页面时,刷新父页面 }