• <tfoot id='5K3dW'></tfoot>

    1. <small id='5K3dW'></small><noframes id='5K3dW'>

        <i id='5K3dW'><tr id='5K3dW'><dt id='5K3dW'><q id='5K3dW'><span id='5K3dW'><b id='5K3dW'><form id='5K3dW'><ins id='5K3dW'></ins><ul id='5K3dW'></ul><sub id='5K3dW'></sub></form><legend id='5K3dW'></legend><bdo id='5K3dW'><pre id='5K3dW'><center id='5K3dW'></center></pre></bdo></b><th id='5K3dW'></th></span></q></dt></tr></i><div id='5K3dW'><tfoot id='5K3dW'></tfoot><dl id='5K3dW'><fieldset id='5K3dW'></fieldset></dl></div>
        • <bdo id='5K3dW'></bdo><ul id='5K3dW'></ul>
        <legend id='5K3dW'><style id='5K3dW'><dir id='5K3dW'><q id='5K3dW'></q></dir></style></legend>

        如何在画布中填充图案并沿形状弯曲?

        时间:2023-06-20

          <small id='lL6Na'></small><noframes id='lL6Na'>

                <bdo id='lL6Na'></bdo><ul id='lL6Na'></ul>
              • <tfoot id='lL6Na'></tfoot>

                1. <legend id='lL6Na'><style id='lL6Na'><dir id='lL6Na'><q id='lL6Na'></q></dir></style></legend>
                    <tbody id='lL6Na'></tbody>
                  <i id='lL6Na'><tr id='lL6Na'><dt id='lL6Na'><q id='lL6Na'><span id='lL6Na'><b id='lL6Na'><form id='lL6Na'><ins id='lL6Na'></ins><ul id='lL6Na'></ul><sub id='lL6Na'></sub></form><legend id='lL6Na'></legend><bdo id='lL6Na'><pre id='lL6Na'><center id='lL6Na'></center></pre></bdo></b><th id='lL6Na'></th></span></q></dt></tr></i><div id='lL6Na'><tfoot id='lL6Na'></tfoot><dl id='lL6Na'><fieldset id='lL6Na'></fieldset></dl></div>
                2. 本文介绍了如何在画布中填充图案并沿形状弯曲?的处理方法,对大家解决问题具有一定的参考价值,需要的朋友们下面随着跟版网的小编来一起学习吧!

                  问题描述

                  我有一张这样的图像 我想用这样的图案填充 得到这样的结果 .

                  I have one image like this and I want to fill with pattern like this to make result like this .

                  我可以使用以下代码填充图案,但我不知道如何沿着衣领形状正确弯曲图案,因为它应该看起来像真的,但我的结果变成了这样..

                  I can fill the pattern using following code but I don't know how to curve pattern properly along the collar shape because it should look like real but my result become like this. .

                  这是我的示例脚本

                  $(function(){
                  drawCanvas("body","collar","images/collar.png", 180);
                  
                  function drawCanvas(overlayType, canvasID, imageSource, degreeRotate){
                      var canvas=document.getElementById(canvasID);
                      var ctx=canvas.getContext("2d");
                  
                      var imgBody=new Image();
                      var imgPattern=new Image();
                      imgPattern.onload=function(){
                  
                          imgBody.onload=function(){
                              start();
                          }
                  
                          imgBody.src=imageSource;
                      }
                      imgPattern.src="images/pattern.png";
                  
                      function start(){
                          ctx.drawImage(imgBody,0,0);
                          if(overlayType=="body"){
                              ctx.globalCompositeOperation="source-atop";
                              ctx.globalAlpha=.85;
                  
                              var pattern = ctx.createPattern(imgPattern, 'repeat');
                              ctx.fillStyle = pattern;
                              ctx.rect(0, 0, canvas.width, canvas.height);
                              ctx.rotate(degreeRotate * Math.PI/180);
                  
                              ctx.fill();
                              ctx.translate(150,0);
                  
                              ctx.globalAlpha=.1;     
                              ctx.drawImage(imgBody,150,0);   
                          }
                      }
                  }});
                  

                  有人可以指导我如何管理图案以沿着侧领形状弯曲以看起来像真的吗?

                  Can someone guide me to how to manage pattern to curve along side collar shape to look like real?

                  推荐答案

                  你可以通过简单地垂直切割和偏移你的图案来实现这一点

                  原领"图:

                  用弯曲的格子纹理填充的衣领

                  Collar filled with curved checkered texture

                  **方法:*

                  • 使用您的方格纹理创建平铺图像.
                  • 将该纹理图像绘制到临时画布上.
                  • 获取临时画布的图像数据.
                  • 对于每一列像素,将整列偏移你领子的曲线.
                  • 二次曲线非常适合您的衣领曲线,因此我在示例中使用它来确定 Y 偏移量.
                  • 将图像数据放回临时画布上.
                  • (您现在可以将曲线方格图案应用于您的衣领图像).
                  • 在主画布上绘制衣领图像.
                  • 设置 context.globalCompositeOperation="source-atop"
                  • 将纹理从临时画布绘制到主画布上.
                  • (合成模式只会在衣领上绘制纹理,而不是背景)

                  这是代码和小提琴:http://jsfiddle.net/m1erickson/hdXyk/

                  <!doctype html>
                  <html>
                  <head>
                  <link rel="stylesheet" type="text/css" media="all" href="css/reset.css" /> <!-- reset css -->
                  <script type="text/javascript" src="http://code.jquery.com/jquery.min.js"></script>
                  
                  <style>
                      body{ background-color: ivory; padding:20px; }
                      canvas{border:1px solid red;}
                  </style>
                  
                  <script>
                  $(function(){
                  
                      // get canvas references (canvas=collar, canvas1=texture)
                      var canvas=document.getElementById("canvas");
                      var ctx=canvas.getContext("2d");
                      var canvas1=document.getElementById("canvas1");
                      var ctx1=canvas1.getContext("2d");
                  
                      // preload the texture and collar images before starting
                  
                      var textureImg,collarImg;
                      var imageURLs=[];
                      var imagesOK=0;
                      var imgs=[];
                      imageURLs.push("https://dl.dropboxusercontent.com/u/139992952/stackoverflow/checkered.png");
                      imageURLs.push("https://dl.dropboxusercontent.com/u/139992952/stackoverflow/collar.png");
                      loadAllImages();
                  
                      function loadAllImages(callback){
                          for (var i = 0; i < imageURLs.length; i++) {
                              var img = new Image();
                              img.crossOrigin="anonymous";
                              imgs.push(img);
                              img.onload = function(){ 
                                  imagesOK++; 
                                  if (imagesOK==imageURLs.length ) {
                                        textureImg=imgs[0];
                                        collarImg=imgs[1];
                                        start();
                                  }
                              }; 
                              img.src = imageURLs[i];
                          }      
                      }
                  
                  
                      function start(){
                  
                          // set both canvas dimensions
                          canvas.width=collarImg.width;
                          canvas.height=collarImg.height+5;
                          canvas1.width=textureImg.width;
                          canvas1.height=textureImg.height;
                  
                          // draw the textureImg on canvas1
                          ctx1.drawImage(textureImg,0,0,canvas1.width,canvas1.height);
                  
                          // curve the texture into a collar shaped curved 
                          curveTexture(collarImg.width,collarImg.height);
                  
                          // draw the collarImg on canvas
                          ctx.drawImage(collarImg,0,0);
                  
                          // set compositing to source-atop
                          // any new drawing will ONLY fill existing non-transparent pixels
                          ctx.globalCompositeOperation="source-atop";
                  
                          // draw the curved texture from canvas1 onto the collar of canvas
                          // (the existing pixels are the collar, so only the collar is filled)
                          ctx.drawImage(canvas1,0,0);


                      }
                  
                      function curveTexture(w,h){
                  
                          // define a quadratic curve that fits the collar bottom
                          // These values change if the collar image changes (+5,-32)
                          var x0=0;
                          var y0=h+5;
                          var cx=w/2;
                          var cy=h-32;
                          var x1=w;
                          var y1=h+5;
                  
                          // get a,b,c for quadratic equation
                          // equation is used to offset columns of texture pixels
                          // in the same shape as the collar
                          var Q=getQuadraticEquation(x0,y0,cx,cy,x1,y1);
                  
                          // get the texture canvas pixel data
                          // 2 copies to avoid self-referencing
                          var imageData0 = ctx1.getImageData(0,0,w,h);
                          var data0 = imageData0.data;
                          var imageData1 = ctx1.getImageData(0,0,w,h);
                          var data1 = imageData1.data;
                  
                          // loop thru each vertical column of pixels
                          // Offset the pixel column into the shape of the quad-curve
                          for(var y=0; y<h; y++) {
                            for(var x=0; x<w; x++) {
                  
                                // the pixel to write
                                var n=((w*y)+x)*4;
                                // the vertical offset amount
                                var yy=parseInt(y+h-(Q.a * x*x + Q.b*x + Q.c));
                                // the offset pixel to read
                                var nn=((w*yy)+x)*4;
                  
                                // offset this pixel by the quadCurve Y value (yy)
                                data0[n+0]=data1[nn+0];
                                data0[n+1]=data1[nn+1];
                                data0[n+2]=data1[nn+2];
                                data0[n+3]=data1[nn+3];
                            }
                          }
                          ctx1.putImageData(imageData0,0,0);
                      }
                  
                  
                      // Quadratic Curve: given x coordinate, find y coordinate
                      function getQuadraticY(x,Q){
                          return(Q.a * x*x + Q.b*x + Q.c);
                      }
                  
                      // Quadratic Curve: 
                      // Given: start,control,end points
                      // Find: a,b,c in quadratic equation ( y=a*x*x+b*x+c )
                      function getQuadraticEquation(x0,y0,cx,cy,x2,y2){
                          // need 1 more point on q-curve, so calc its midpoint XY
                          // Note: since T=0.5 therefore TT=(1-T)=0.5 also [so could simplify]
                          var T=0.50;
                          var TT=1-T;
                          var x1=TT*TT*x0+2*TT*T*cx+T*T*x2;
                          var y1=TT*TT*y0+2*TT*T*cy+T*T*y2;
                          var A = ((y1-y0)*(x0-x2) 
                                + (y2-y0)*(x1-x0))/((x0-x2)*(x1*x1-x0*x0) 
                                + (x1-x0)*(x2*x2-x0*x0));
                          var B = ((y1-y0)-A*(x1*x1-x0*x0))/(x1-x0);
                          var C = y0-A*x0*x0-B*x0;
                          return({a:A,b:B,c:C});
                      }
                  
                  
                  }); // end $(function(){});
                  </script>
                  
                  </head>
                  
                  <body>
                      <p>"Curve" a texture by offsetting Y pixels based on Q-curve</p>
                      <canvas id="canvas" width=300 height=300></canvas>
                      <p>The temporary texture canvas</p>
                      <canvas id="canvas1" width=300 height=300></canvas>
                  </body>
                  </html>
                  

                  这篇关于如何在画布中填充图案并沿形状弯曲?的文章就介绍到这了,希望我们推荐的答案对大家有所帮助,也希望大家多多支持跟版网!
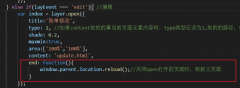
                  上一篇:在画布中制作可点击区域以更改图像 下一篇:使用没有服务器端代码的 javascript 将 html 文本渲染为位图

                  相关文章

                  <tfoot id='6KX71'></tfoot>

                    1. <legend id='6KX71'><style id='6KX71'><dir id='6KX71'><q id='6KX71'></q></dir></style></legend>
                      • <bdo id='6KX71'></bdo><ul id='6KX71'></ul>
                    2. <i id='6KX71'><tr id='6KX71'><dt id='6KX71'><q id='6KX71'><span id='6KX71'><b id='6KX71'><form id='6KX71'><ins id='6KX71'></ins><ul id='6KX71'></ul><sub id='6KX71'></sub></form><legend id='6KX71'></legend><bdo id='6KX71'><pre id='6KX71'><center id='6KX71'></center></pre></bdo></b><th id='6KX71'></th></span></q></dt></tr></i><div id='6KX71'><tfoot id='6KX71'></tfoot><dl id='6KX71'><fieldset id='6KX71'></fieldset></dl></div>

                      <small id='6KX71'></small><noframes id='6KX71'>